Rails(5系)でGoogle Fontsを使う
難しいことは抜きにして意外と、簡単にWebFont使えます。
似たような方法で、Rails(6系)でも実装できるはず…
まずは、完成形のソースコードから。
/*
 * This is a manifest file that'll be compiled into application.css, which will include all the files
 * listed below.
 *
 * Any CSS and SCSS file within this directory, lib/assets/stylesheets, or any plugin's
 * vendor/assets/stylesheets directory can be referenced here using a relative path.
 *
 * You're free to add application-wide styles to this file and they'll appear at the bottom of the
 * compiled file so the styles you add here take precedence over styles defined in any other CSS/SCSS
 * files in this directory. Styles in this file should be added after the last require_* statement.
 * It is generally better to create a new file per style scope.
 *
 *= require_tree .
 *= require_self
 */

@import url('https://fonts.googleapis.com/css2?family=Sawarabi+Gothic&display=swap');

body {
  font-family: 'Sawarabi Gothic', sans-serif;
}
では、上記のソースコードに落ち着くまでの手順です
- Google Fontsにアクセス
- 好きなフォントを選び Regular 400 で + Select this style する。

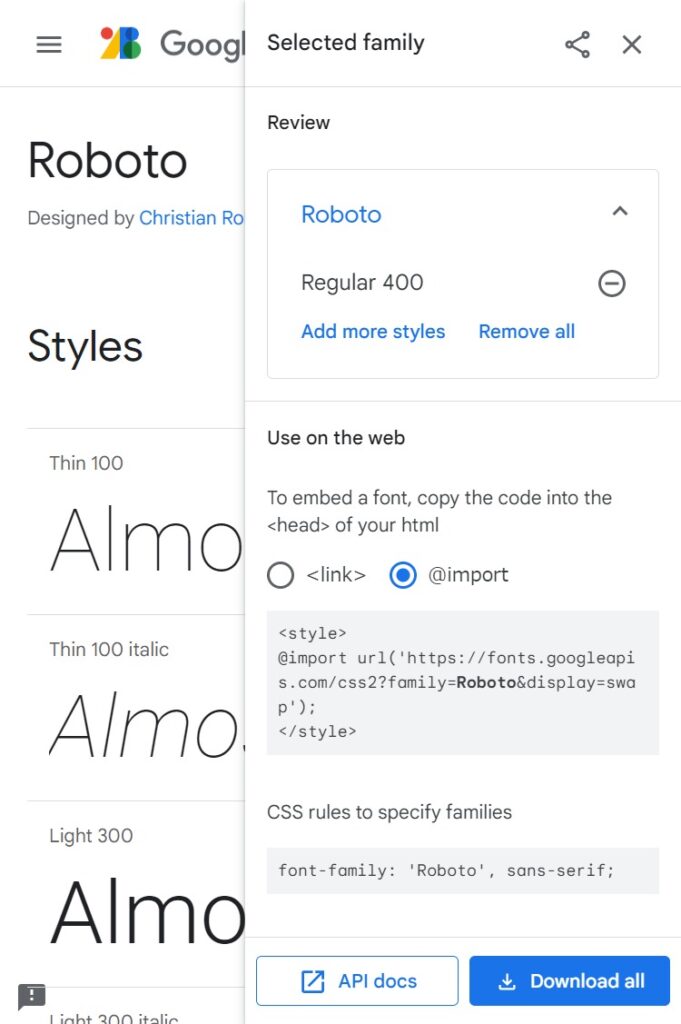
- Selected familyが表示されるはず!
もし表示されない場合は、画面右上のView you selected familiesを選択
- Use on the webで@importを選択する。

- @importの行をコピーして、application.sassに貼り付け
<style>
// 以下の1行をコピー
@import url('https://fonts.googleapis.com/css2?family=Roboto&display=swap');
</style>- 適用させたい対象に対し以下のように記述すれば完了。
font-familyの記述は、CSS rules to specify familiesを参考にしてください。
あとは、適用されているか確認してみましょう!
/*
 * This is a manifest file that'll be compiled into application.css, which will include all the files
 * listed below.
 *
 * Any CSS and SCSS file within this directory, lib/assets/stylesheets, or any plugin's
 * vendor/assets/stylesheets directory can be referenced here using a relative path.
 *
 * You're free to add application-wide styles to this file and they'll appear at the bottom of the
 * compiled file so the styles you add here take precedence over styles defined in any other CSS/SCSS
 * files in this directory. Styles in this file should be added after the last require_* statement.
 * It is generally better to create a new file per style scope.
 *
 *= require_tree .
 *= require_self
 */

@import url('https://fonts.googleapis.com/css2?family=Roboto&display=swap');

body {
  font-family: 'Roboto', sans-serif;
}
応用編
英語フォントと日本語フォントを選択して英語と日本語のフォントを別々で表示させる技
仕組み的には、まず英語フォントを適用させて、それ以外の文字を代替フォントとして日本語を適用させる感じです。
以下の場合は、英語フォントにJetBrains Monoを適用させ、日本語フォントにNoto Sans JPを適用という感じです。
当ブログのフォント構成は、これと同じ構成です。(WordPressだけど)
/*
 * This is a manifest file that'll be compiled into application.css, which will include all the files
 * listed below.
 *
 * Any CSS and SCSS file within this directory, lib/assets/stylesheets, or any plugin's
 * vendor/assets/stylesheets directory can be referenced here using a relative path.
 *
 * You're free to add application-wide styles to this file and they'll appear at the bottom of the
 * compiled file so the styles you add here take precedence over styles defined in any other CSS/SCSS
 * files in this directory. Styles in this file should be added after the last require_* statement.
 * It is generally better to create a new file per style scope.
 *
 *= require_tree .
 *= require_self
 */

@import url('https://fonts.googleapis.com/css2?family=JetBrains+Mono&family=Noto+Sans+JP&display=swap');

body {
  font-family: 'JetBrains Mono', 'Noto Sans JP', monospace;
}